
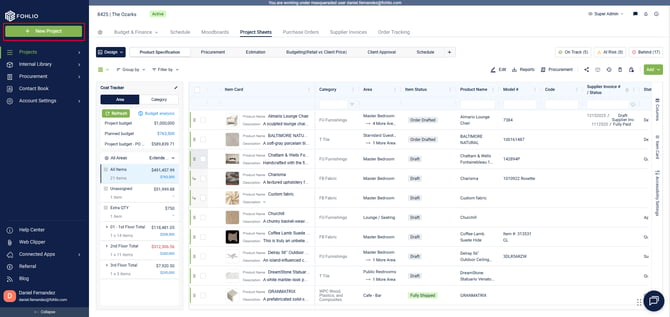
🚀 Getting Started: Initiate the Project Creation Flow
🚀 Getting Started: Initiate the Project Creation Flow
To begin creating a project in Fohlio:
-
Navigate to the Main Menu
-
Click New Project
🧭 Step 1: Start a New Project
Navigate to the Main Menu, then click New Project.
Fill in the project details:
-
-
Project Name and optional Project Number
-
Project Type (e.g., Single Family, Hospitality)
-
Client – Select an existing client or click New Client to create one
- Project Address
- Billing Contact – The person or company who will receive invoices for items, fees, and other project-related costs
- Budget
-
-
- Target Margin
Define access for your project team:
Here you’ll see a list of the internal users on your team. From this screen, you can assign roles and permissions to manage who can access and edit the project.
-
-
Project Admin – Full editing rights and management access
-
Edit Access – Can update project data but not manage settings
-
View Access – Read-only access to the project
-
No Access – The member won’t be able to view this project
-
Click Next to continue.

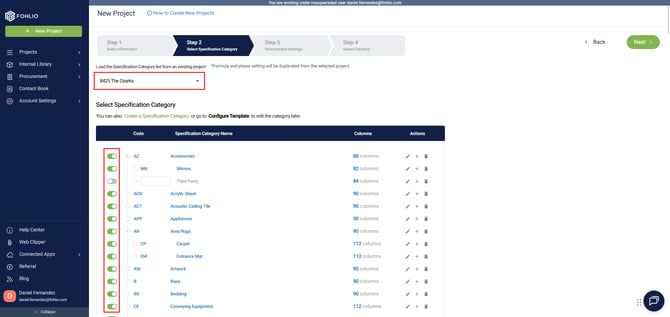
🗂️ Step 2: Select Specification Categories
In this step, you can:
-
Use the toggle on the left to activate or deactivate categories for this project.
Grey categories indicate they are inactive and will not appear in your Project Sheets.
This allows you to enable only the categories you need—helping tailor the interface to your project's scope and reduce visual clutter. -
Import a category setup from an existing project via the dropdown if you'd like to reuse an established configuration.
This is ideal when working with templates or repeating project types—Fohlio will automatically copy the active categories and their structure from the selected project.
Note: When importing from another project, any formulas and phase settings associated with the selected project will also be duplicated into the new one.
For an in-depth guide on managing category settings, see this article.
Click Next to continue.
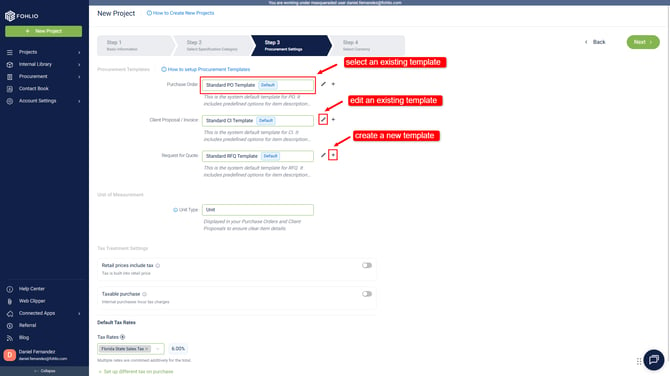
⚙️ Step 3: Procurement Settings
In this step, you'll configure how procurement and costing are handled in the project. This step is divided into three sections:
📜 Procurement Templates
-
Select the Procurement Templates you’ll use in this project.
These templates define how data is structured in documents such as:-
Purchase Orders
-
Client Proposals / Invoices
-
Requests for Quote
-
-
For each template, you’ll specify:
-
Which column supplies the Item Name
-
Which column provides the Item Description
-
Which column defines Pricing
-
💡 For detailed help on configuring procurement templates, visit our Procurement Templates Guide.
📏 Units of Measurement
-
Select the Column that defines the unit of measurement for items in your purchase orders (e.g., pieces, each, boxes, meters).
🏦 Tax Treatment Settings
- Define if retail prices include taxes.
- Define if your client is tax excempt.
-
Choose the Tax(es) to apply to this project based on your location or requirements.
Click Next to continue.
💱 Step 4: Select Project Currency
Choose the default Project Currency for your financial documents and set up any necessary exchange rates.
-
Use the dropdown to select the primary currency for this project (e.g., USD, EUR, CAD).
-
Click the green Add Currencies button to include additional currencies you’ll be working with.
-
Once added, you can set exchange rates between the selected currencies to support international purchasing and calculations.
Note: If you're not planning to make international purchases or use multiple currencies, it's best to disable currency management for this project.
You can do this by toggling off the Enable Currency option.
This is the final configuration step before launching your project.
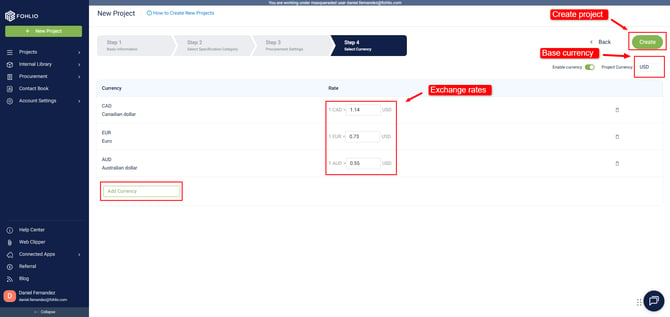
✅ Once everything is set, click Create to finalize your project setup. You're now ready to begin working on your Project Sheets and start specifying items!
Note: it may take up to 30 minutes for a project to be created, you will be notified when project creation is done.
We hope this article was helpful, please rate the article, and reach us via Live Help if you still need assistance.