
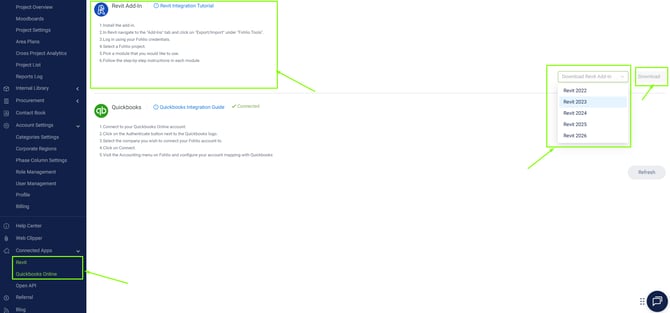
Downloading the
Make sure the Add-inis downloaded first:
-
Open integration in Fohlio after logging in > https://app.fohlio.com/integrations.
-
Under Revit Add-In select the Revit version you are working with
-
Download.
-
Install the Add-in to your Revit
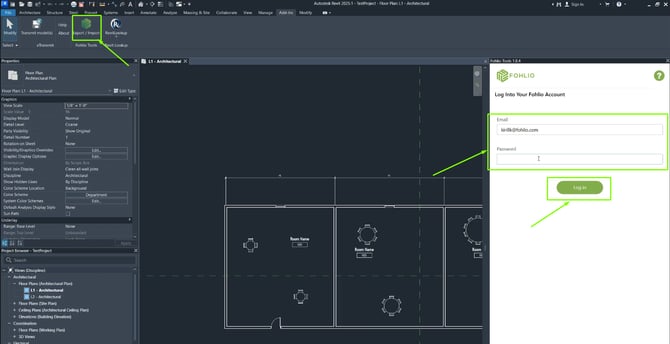
Installation and Login
Once the Fohlio Revit plugin is successfully installed:
-
Open Revit.
-
Navigate to the Fohlio tab in the ribbon.
-
Click the Fohlio icon to open the plugin panel on the right.
-
Log in using your Fohlio credentials.
Exporting Data from Revit to Fohlio
Step 1: Select Project and Map Rooms to Areas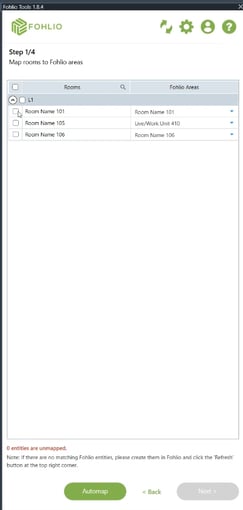
-
Select the Fohlio project you'd like to export data to.
-
Choose the rooms from your Revit model.
-
Map each room to a corresponding area in Fohlio using the dropdown.
Step 2: Set Up Layers (Optional)
-
You can assign different Revit entities to specific Fohlio layers.
-
Example: Assign all Levels to a "Floors" layer and all Rooms to a "Rooms" layer.
-
-
If a layer doesn’t exist yet in Fohlio, it will be created automatically.
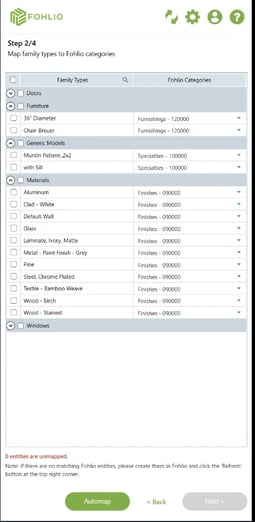
Step 3: Select Families and Categories
-
Choose which family types and categories you want to export.
-
Fohlio captures:
-
Items from selected rooms
-
Surface materials
-
Embedded material data
-
Step 4: Category Mapping
-
You can assign:
-
A Fohlio category for all items
-
A Revit category to match
-
-
Use the AutoMap button to automate mapping based on your preferences.
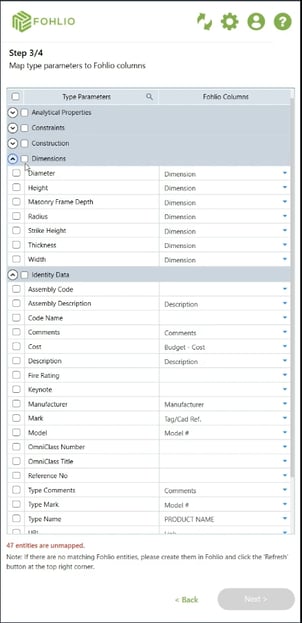
Step 5: Parameter to Column Mapping
-
Map Revit type parameters to Fohlio columns.
-
You can concatenate multiple Revit parameters into one Fohlio column if needed.
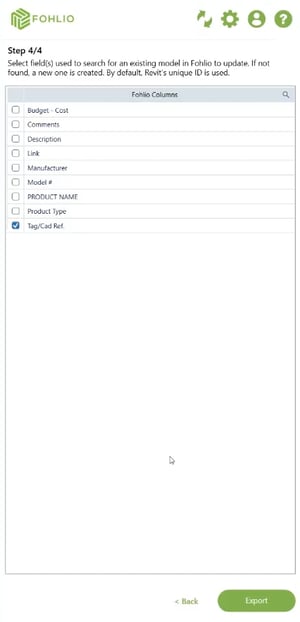
Step 6: Unique Identifier
-
Specify a Revit parameter (e.g.,
Tag Reference) as a unique identifier. -
If the item exists in Fohlio with the same identifier, it will be updated instead of duplicated.
Importing Data from Fohlio to Revit
Step 1: Assign Matching Identifier in Revit
-
Create or select a Revit item you want to update.
-
Assign the same identifier value as the Fohlio item
Step 2: Update Parameters from Fohlio
-

Select the Revit element you wish to update.
-
Choose which Fohlio columns to import values from:
-
Description
-
Model number
-
Images
-
Other metadata
-
Step 3: Run Import
-
Click Import to sync data.
-
Revit item will now display Fohlio data including images, text, and values.

Additional Notes
-
All parameter values mapped to the same Fohlio column will appear concatenated with their parameter names.
-
Use the refresh function within the plugin panel if any values are not displaying correctly.
Best Practices
-
Always verify your parameter-to-column mappings before exporting or importing.
-
Use a consistent unique identifier across Fohlio and Revit to prevent duplicates.
-
Use AutoMap to streamline repetitive mapping tasks.
You can also learn more about this by watching the Live Training session we had for it
What You Can Do with the Fohlio–Revit Integration
-
Sync Revit and Fohlio data
Keep Revit models and Fohlio specifications aligned through one-way or two-way data synchronization. -
Export Revit models to Fohlio
Send rooms, model elements, quantities, and selected parameters from Revit directly into Fohlio. -
Auto-create and structure areas
Automatically generate Fohlio areas based on Revit levels and rooms, preserving project structure. -
Map categories and parameters
Control how Revit families and parameters are mapped to Fohlio categories and columns. -
Centralize specifications in Fohlio
Manage manufacturers, descriptions, pricing, and statuses in Fohlio instead of editing each Revit family. -
Import data back into Revit
Push updated specification data from Fohlio into existing Revit elements and parameters. -
Use unique identifiers for synchronization
Link items between systems using a unique key to update data without creating duplicates. -
Support iterative design workflows
Update or switch specifications quickly without remodeling by changing the linked item data. -
Standardize mappings across teams
Save parameter mappings so all team members use the same configuration across projects. -
Work with project templates and family libraries
Populate Revit templates and standard family libraries with data managed in Fohlio.
For further information about this you can reach out to live help or