
Why It’s Important
The Order Tracking module gives you end-to-end visibility over purchase orders and shipments. With it, you can:
-
Filter shipments by project, supplier, status, date, or PO number
-
Track shipment stages from creation to delivery
-
Manage multiple shipments for the same PO
-
Attach tracking details, documents, and notes for full traceability
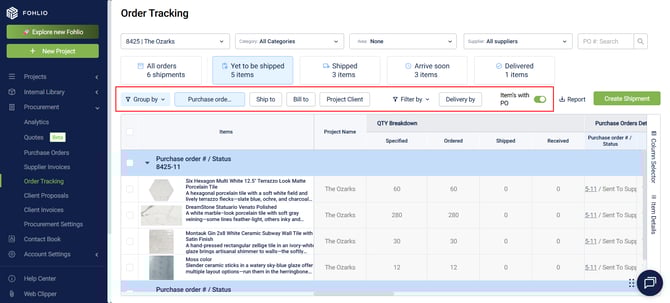
🧭 Understanding the Dashboard
When you open Order Tracking (Main Menu → Procurement → Order Tracking), you’ll see a dashboard with quick filters at the top and shipment stages below.
1. Quick Filters
All filters are grouped together at the top of the page:
-
Project Selector – Select one or multiple projects.
-
Category and Area Selectors – Available when a single project is selected.
-
Supplier Filter – Narrow results to a supplier.
-
Shipment Status Filter – Focus on specific stages.
-
Dates Filter – Set a timeframe.
-
PO Number Filter – Search directly by purchase order.

2. Stages
Below the filters, shipments are organized into lifecycle stages:
-
All Orders – A consolidated list of all shipments.
-
Yet to Be Shipped – Items pending shipment, no shipment record yet.
-
Shipped – Items with a shipment created and shipped date added.
-
Arriving Soon – Items with an estimated delivery date within a configurable timeframe (e.g., 7 or 10 days).
-
Delivered – Items with a received date recorded.

3. Grouping and Filtering Items
-
Use Group By to organize items by supplier, PO, shipping address, or any other project column.
-
Apply quick filters at the stage level for a focused view.
- Items with PO Toggle – Show only items linked to a PO, or switch to view items without one (Only available in the Yet to be shipped stage).
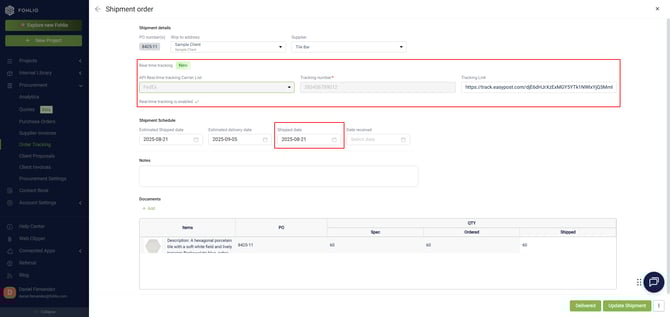
📦 Creating a Shipment
1. Select Items
From Yet to Be Shipped, choose the items you want to ship.
2. Create Shipment
Click Create Shipment to open the side panel.
3. Enter Shipment Details
-
Supplier and ship-to address
-
Carrier and tracking number
-
Click Fetch Shipment Live Update to generate a real-time tracking link (powered by Fohlio’s API).
See our article on Real-Time Shipment Tracking via API for more details.
-
Estimated ship and delivery dates, or actual dates if available
-
Notes and attached documents
4. Set Quantities
-
Specification Quantity – From your project (fixed)
-
Order Quantity – From the PO (fixed)
-
Shipped Quantity – Allows for partial shipments (editable)
5. Save and Update Status
Save the shipment and mark as Shipped or Delivered, depending on the status.

Pro tip 💡: For split shipments, repeat the process with partial quantities until the full order is shipped.
📦 Managing Split Shipments
If items are shipped in multiple batches:
-
Select the item and click Create Shipment.
-
Enter the first shipment’s quantity and save.
-
Repeat the process for the remaining amounts.
The purchase order will list all linked shipments for visibility.

📑 Updating Shipments
You can update shipments as they move across stages:
-
Add or edit estimated and actual dates
-
Attach more documents
-
Adjust shipped quantities
Statuses update automatically once you enter new dates.
🖥 Customizing Your View
-
Show or hide columns per stage.
-
Add project sheet columns to display more detail.
-
From Item Details Configure the Product Card view to show item images or specific fields.
-
Adjust column widths for easier reading.

📋 Quick Workflow Summary
-
Filter & locate items → Use quick filters and stage views.
-
Create shipments → Add carrier, tracking number, and shipment details.
-
Track & update → Monitor stages, manage partial shipments, and apply updates.
✅ Wrap-Up
The Order Tracking module helps you:
-
Centralize shipment tracking across projects
-
Manage partial and split deliveries
-
Stay updated with statuses and real-time tracking links
-
Customize your view for clarity and control
We hope this article was helpful, please rate the article, and reach us via Live Help if you still need assistance.