
Often times you will need to move items from one project to another or within the same project. The Move feature is simple to use and can help you do very sophisticated things.
1. First select the items you want to Move. Then go to Edit > and click Move.

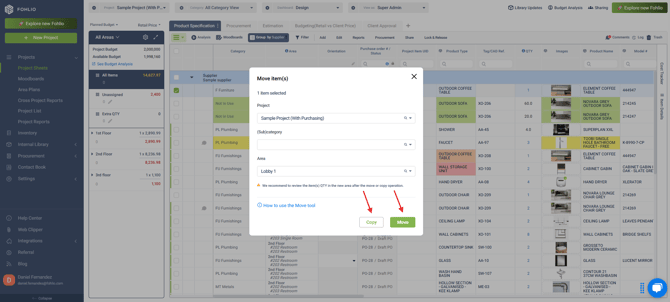
2. The Move window will pop up, and here you can decide to move the selected items to three different fields;
Project - moving the items to a different Project
(Sub)category - moving the items to a different Category/Subcategory
Area - moving items to a different Area/Subarea
3. Move option glossary and examples:
A) Move: The item(s) selected will be moved from the original place to the newly selected area. Example: I want to move chair AC-1 from the Living Room to the Corridor. The chair will move within the project areas.
B) Copy: The item(s) selected will stay in the original area and a new independent copy will be added to the selected area.
Example: I want to use the AC-1 chair in two different projects. By copying the item from one project to the other, I can track availability and pricing separately for each project, since they are not linked and are independent.
Pro Tip: Whenever you need to change the Category for a large number of items, the Move tool is the best way to accomplish so.
Pro Tip 2: If you have Parent Items that need unique Components throughout a project, you can use the Move tool > Copy as Independent, so each Parent item is treated independently.
We hope this article was helpful, please rate the article, and reach us via Live Help if you still need assistance.