
Before You Start: Group Items by Supplier
Each purchase order can only include items from one supplier, you cannot combine multiple suppliers on the same PO.
Our recommendation: group your items by supplier first, and do a final check on prices and quantities before creating the PO. Keep in mind that a PO can be created from selected items across all areas of the project, not just one area.
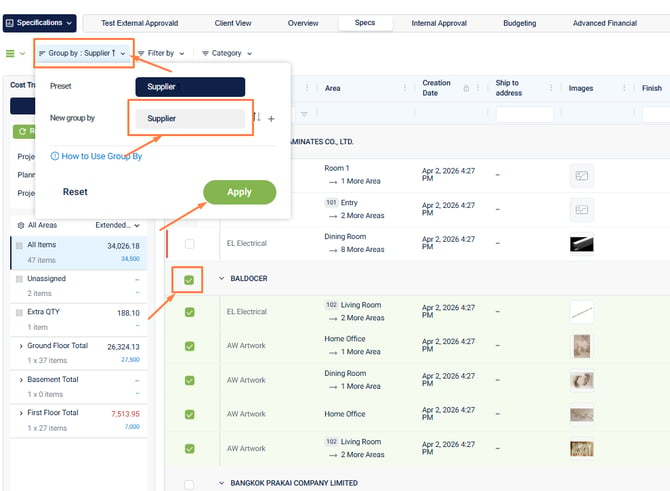
Before creating the PO:
- Filter or group items by the supplier you want to order from.
- Double-check prices, quantities, and item details.
- Confirm everything is correct before proceeding.
Step 1: Create the Purchase Order
- Select the items from the supplier you want to create a PO for.
- Go to Procurement in the top menu.
- Click Create Purchase Order.
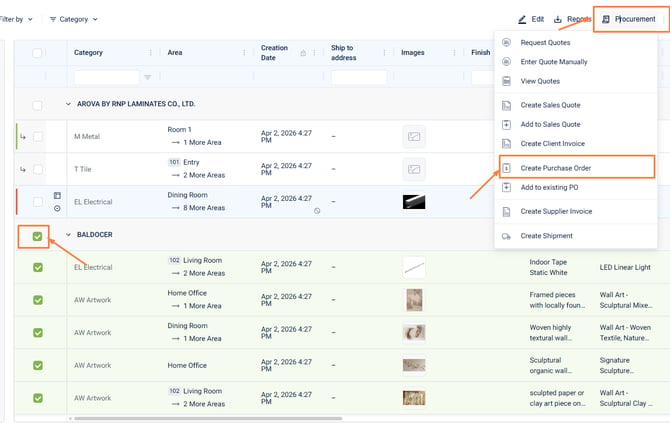
After selecting your items and clicking Create Purchase Order, Folio will generate one PO document for those items.
⚠️ Important: Multiple POs from the Same Supplier?
If Folio creates more than one PO even though the items are under the same supplier, check the following — these are the two most common causes:
- Supplier contact items must belong to the exact same supplier contact, not just the same supplier company.
- Ship-to address if any item on the Project Sheet has a different ship-to address, Folio will split it into a separate PO.
Step 2: Review the Purchase Order Document
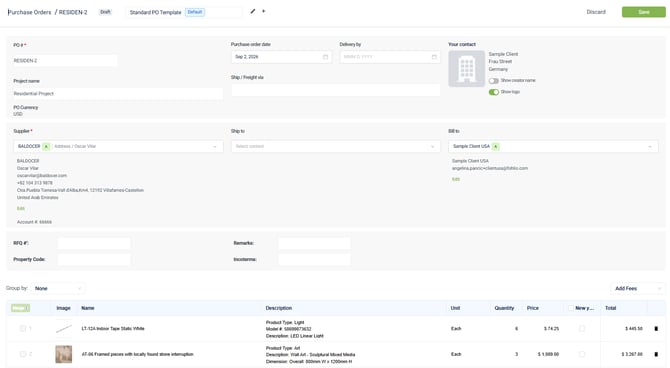
Once created, your PO document will include the following details:
- PO number — this can be set to follow a per-project sequence or a universal sequence across all projects; either way, it will follow the sequence of the last PO created.
- Project name
- Supplier
- Ship-to address — pulled automatically from the Project Sheet if it was set there; otherwise, you can select it directly on the PO. This can be a manufacturer, a warehouse, or the client/project address.
- Bill-to address — also selectable on the document.
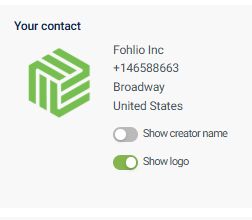
In the top-right corner, you'll see the contact information for the PO creator — pulled from your user profile (name, company, etc.). This will differ per user. If you'd rather use a fixed contact, you can set this up in the PO/Procurement template by selecting a default contact.
Step 3: Review and Edit the Items Table
The items table pulls the following directly from the Project Sheet:
- Image
- Name
- Description
- Unit
- Quantity
- Price
- Tax
- Total
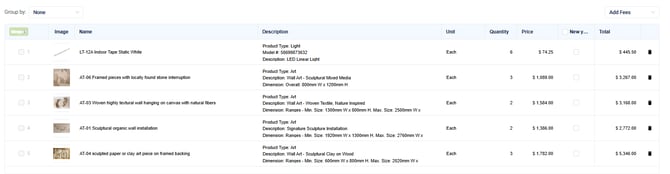
You can edit the description, quantity, and price directly on the PO if needed.
Tax can be:
- Set up via your project's financial settings, or
- Applied manually and directly to all items, or to select items only.
You can also group the table by area and category for easier review.
Step 4: Add Fees
You can add fees directly to the PO, including:
- Soft costs
- Installation
- Shipping
- Customs duties
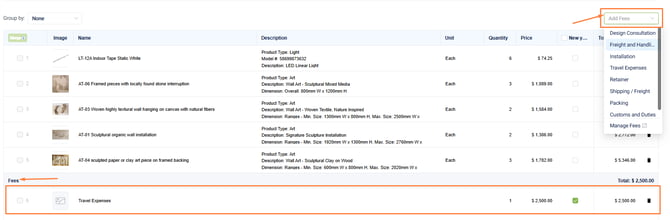
You can create and manage your own custom fee names. Keep in mind: fees are totaled by type, not by name, at the bottom of the PO. So all fees of the same type (e.g., all "Shipping" fees) will be grouped into one total, even if you gave them different individual names.
Step 5: Add Attachments and Set Print Options
Attachments
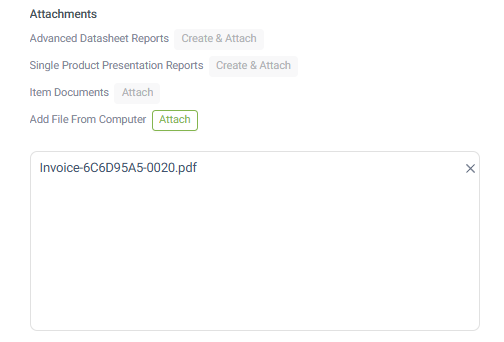
Besides uploading files from your device, you can also generate and attach:
- Advanced data sheets
- Single product presentations
- Any documents already attached to the item itself
- Documents uploaded from your device
Print Settings
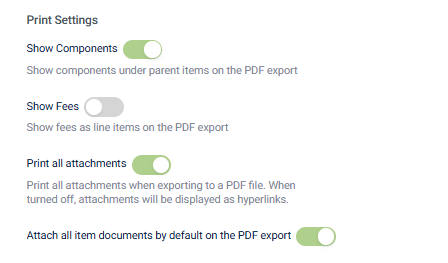
Choose what appears on the downloadable PDF:
- Show or hide components
- Show or hide fees (or just show the total)
- Include any attached documents in the printed/downloadable PDF
Step 6: Add Notes
The Notes section is a free-text field for anything not captured elsewhere on the PO — for example:
- Terms and conditions
- Payment terms
- Any other agreements you need to communicate to the supplier
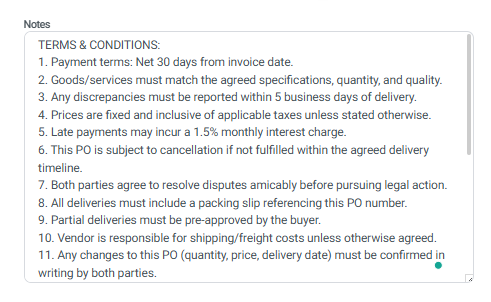
This is the best place to add supplier-facing details that don't fit into a structured field.
Step 7: Save the Purchase Order
Once everything is finalized and checked, click Save. This generates the saved PO document with a set of action options in the top-right corner.
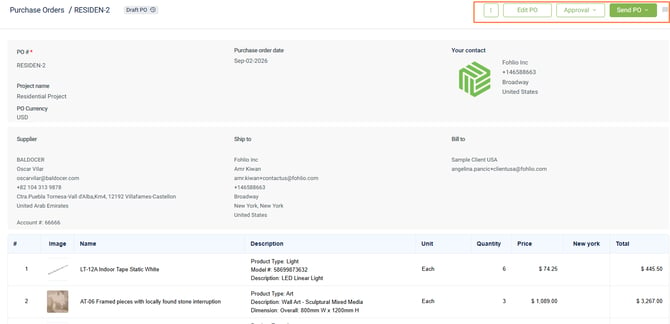
Step 8: Get Approval (Recommended First Step Before Sending)
Before sending the PO to your supplier, you may want to route it for internal approval.
You can:
- Approve it yourself (approve, comment, or reject), or
- Request approval from someone else.
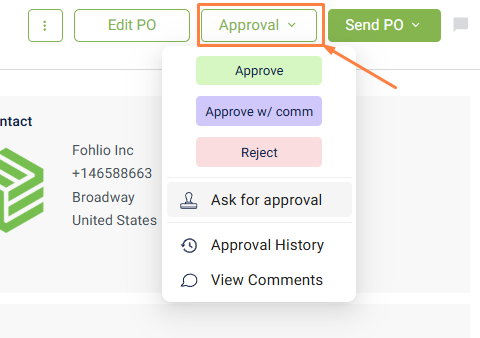
Requesting Approval from a Team Member
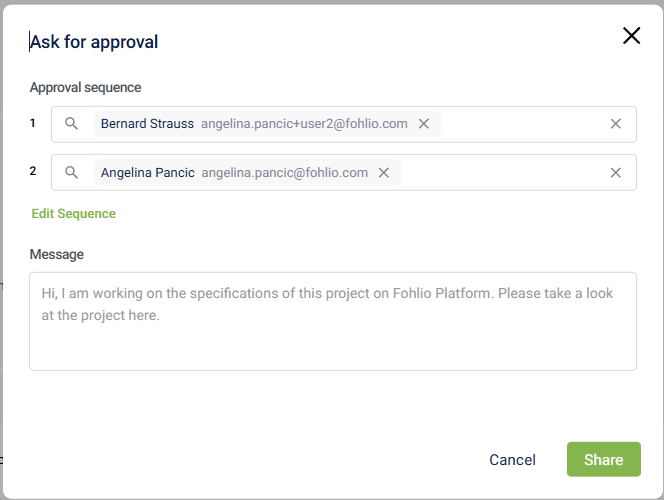
- Depends on the approval sequence set up on your profile.
- You can edit this sequence — request one approver, multiple approvers, or set the number of approval steps needed.
- The approver receives a notification email asking them to review and approve the PO.
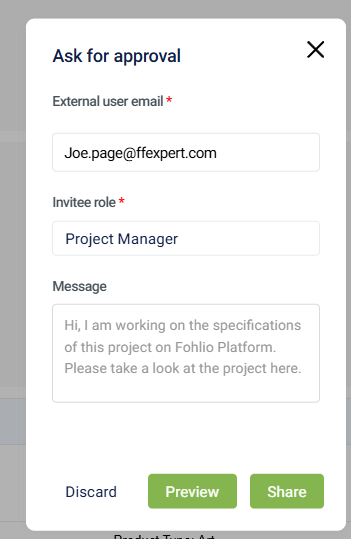
Requesting Approval from an External User
For someone outside your team (or with limited team access):
- Enter their email address.
- Select their role (e.g., Project Manager, Client).
- Click Share.
- If they already have a Folio account, they simply sign in to view and approve.
- If it's their first time, they'll need to sign up (set a password) before accessing the PO.
You can also:
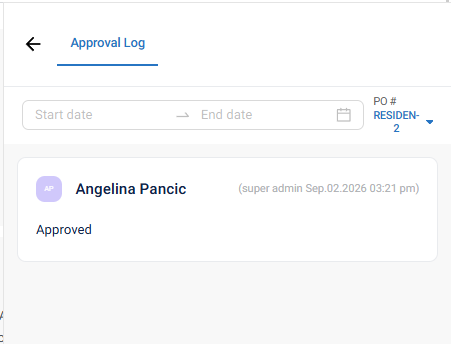
- View the full approval history
- Review comments from anyone with access
- Bypass approval yourself if you're the responsible party
Once approved, the PO is ready to send to the supplier.
Step 9: Send the Purchase Order to the Supplier
From the top-right menu on the saved PO, you have a few options:
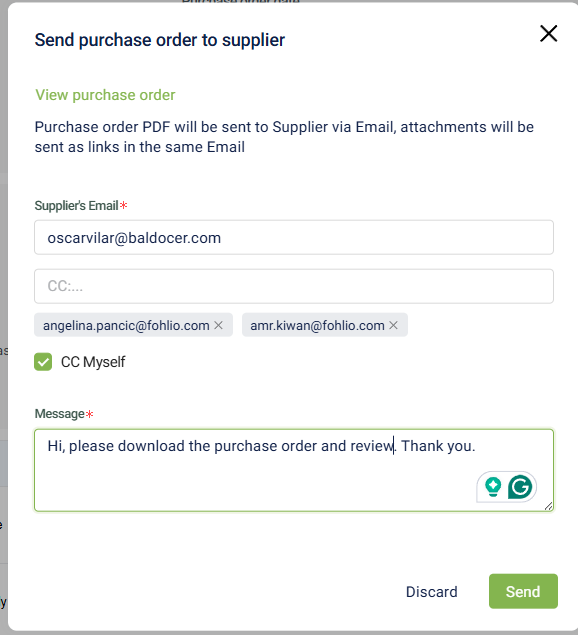
Option 1: Send PO Directly from Folio
Click Send PO. The supplier's email will be auto-populated, but you can:
- Edit the recipient
- Add additional recipients
- CC other people (your own email is CC'd by default)
Option 2: Mark as Sent
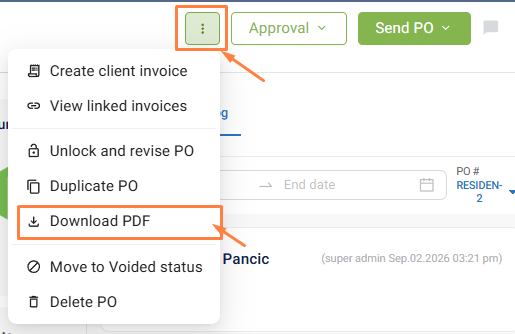
If you prefer to send the PO manually from your own email:
- Click the three dots (⋮) menu.
- Select Download as PDF.
- Send the PDF from your own email client.
- Return to Folio and click Mark as Sent to keep your records accurate.
Step 10: After the PO Is Sent — What's Next
Once the PO is approved and sent, the core process is complete — but you can continue managing it from the same document:
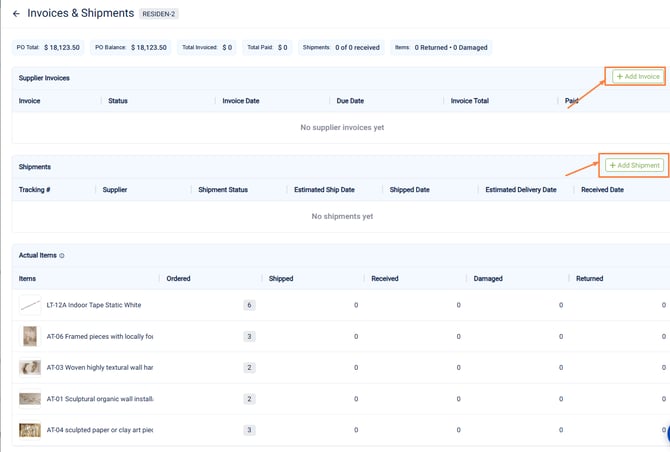
Add Invoices or Shipments
Click Invoices and Shipments to open a side panel where you can:
- Create a supplier invoice
- Add a shipment document
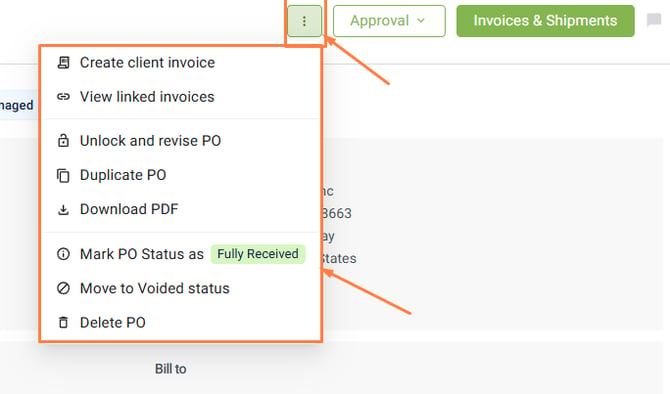
Additional Actions (via the three-dot menu)
- Create Client Invoice — generate a client-facing invoice from the PO
- View Linked Invoices
- Unlock and Revise PO — if the PO needs to be adjusted after sending
- Duplicate PO — create a copy
- Download PDF
- Mark as Fully Received — automatically creates a shipment document without manual entry
- Void PO — removes it from budget/financial calculations while keeping the record
- Delete PO — permanently removes the PO and its full record
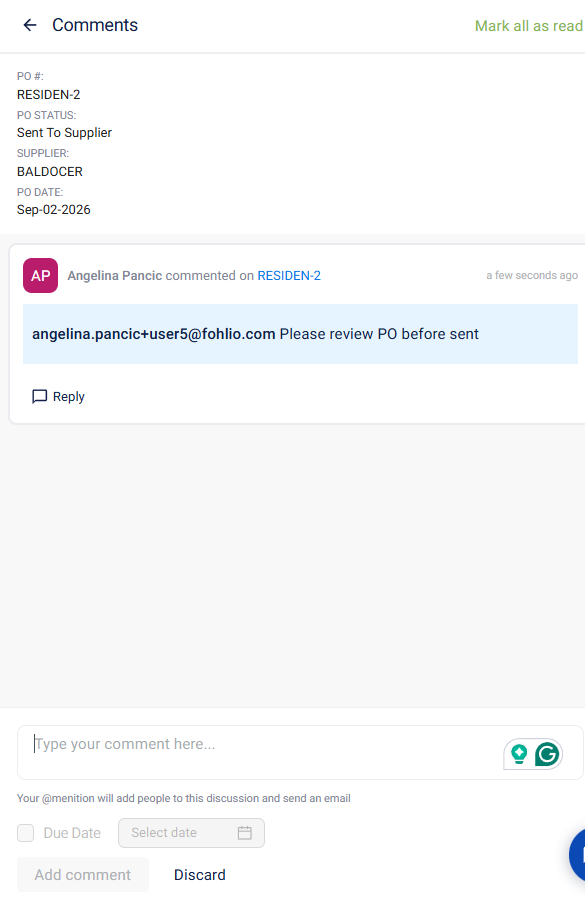
Comments
Add comments directly to the PO and tag team members to communicate about it.
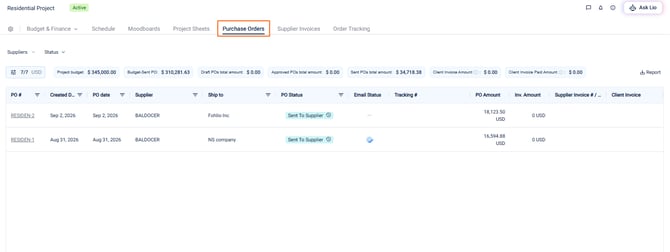
Step 11: Track All Your Purchase Orders
Go to the Purchase Order table to see every PO created for the project. Here you can:
- View totals: project budget, total POs, total POs sent, etc.
- Download a report as PDF or Excel
- Filter by supplier or status
- Check email delivery status
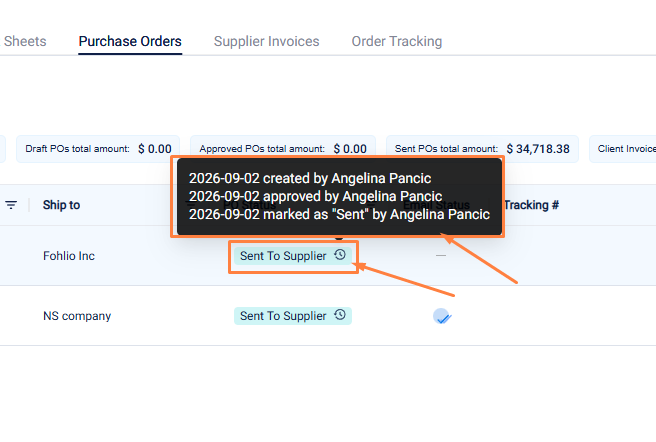
Track PO History
Hover over a PO's status to see its full history — from creation, to approval, to sending.
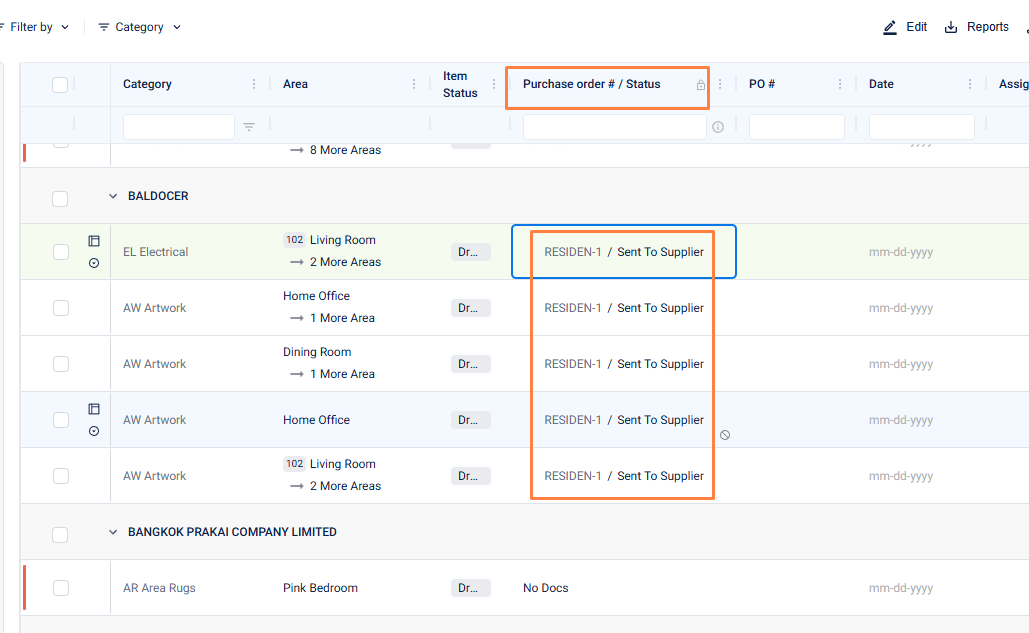
Quick Access from the Project Sheet
On the Project Sheet, the PO Status column includes a direct link to each PO — so you can check on a PO's progress from either location.
Have more questions about the purchase order process? Reach out to our support team — we're happy to help.