
Why It’s Important
Accurate budgets are essential for controlling costs and making informed purchasing decisions. The Area Planner allows you to:
-
View total costs by project, area, or sub-area
-
Factor in extra quantities and area multipliers
-
Choose the right pricing column to ensure calculations are correct
-
Assign budgets per area or sub-area for more precise planning
🧭 Navigating the Area Planner
When you open the Area Planner on the left-hand panel, you’ll see three top-level filters:
-
All Items – Shows all specified items across the project.
-
Displays the total amount for all items, based on the pricing column you’ve selected.
-
Below it, you’ll also see the budgeted amount (planned budget) for the entire project.
-
-
Unassigned – Shows only items that have not been assigned to any area.
-
Extra Quantities – Shows any items where extra quantities have been set.
These act as quick filters: clicking one updates the view so you’re working only with those items.

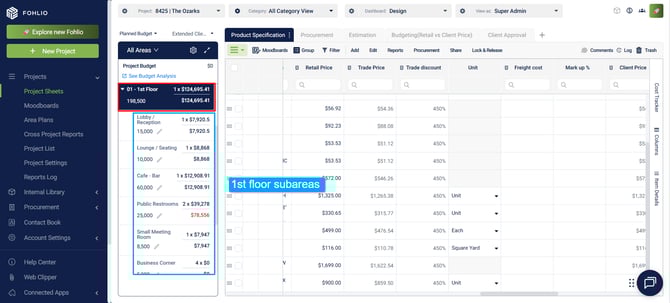
📑 Working with Areas and Sub-Areas
Below the top filters, you’ll see the list of areas you’ve created.
-
Many teams organize areas in two layers:
-
Areas (e.g., First Floor, Second Floor)
-
Sub-Areas (e.g., Lobby, Lounge, Cafe bar, Public Restrooms, Small Meeting Room)
-
You can:
-
Expand an area to view its sub-areas.
-
Click on any area or sub-area to filter the table so you only see items assigned to it.
-
Manage which items belong to which area by assigning or reassigning them as needed.
For each area or sub-area, you’ll see:
-
Planned Budget – The amount you’ve allocated for that space.
-
Specified Items Total – The combined cost of all items currently assigned there, calculated using the selected pricing column.
💰 Choosing the Right Pricing Column
At the top of the Area Planner, you can choose which pricing column to use for totals and budget comparisons.
If the column you need isn’t in the dropdown:
-
Locate the column in your table view.
-
Hover over the ⋯ menu and select Edit Column Details.
-
Scroll to Column Property and set it to Cost/Price.
-
It will now appear in the Area Planner’s pricing column selector.
.gif?width=670&height=303&name=Fohlio%20-%20Google%20Chrome%20-%2015%20August%202025%20(3).gif)
Pro tip 💡: Choose a column that considers both unit price and quantity (e.g., Extended Client Price) for accurate totals.
🖊 Setting Budgets per Area.gif?width=242&height=367&name=Fohlio%20-%20Google%20Chrome%20-%2015%20August%202025%20(2).gif)
-
Click the pen icon next to an area’s budget.
-
Enter the budget amount.
-
For parent areas with sub-areas, set budgets for each sub-area. The parent area’s budget is the sum of its sub-area budgets.
Example: If First Floor has a Lobby ($10,000) and a Lounge ($5,000), the First Floor budget will total $15,000. If the First Floor has a multiplier of 2, the total becomes $30,000.
📋 The Three-Step Budget Tracking Workflow
-
Select the pricing column you’ll use for budget tracking.
-
Set the planned budget for the project and for each area/sub-area.
-
Track your budget over time—each update to quantities or prices will adjust the totals, helping you monitor accuracy and stay on track.
📊 Reporting
Budgets and totals from the Area Planner feed directly into reports. Selecting the right pricing column ensures these numbers account for quantities, not just unit prices.
For example, the Table View Presentation report includes the Project Total—this is the same value you’ve specified in your project sheet. You can also view the same total in the ADS Navigator, making it easy to cross-check and maintain consistency across tools.
We hope this article was helpful, please rate the article, and reach us via Live Help if you still need assistance.