
Why & When RFQs Matter 🔎
🧭 Step 2: Launch Request Quotes
-
Toolbar ➜ Procurement ➜ Request Quotes.
-
Pick an RFQ template (or create/edit—see Step 2a).
-
Click Continue to open the draft RFQ.
| Use Case | Why It’s Helpful |
|---|---|
| Supplier Selection (Bidding) | Compare multiple vendors side-by-side and choose the best mix of cost, lead-time, and freight. |
| Total-Cost Visibility | Capture not just unit price but freight cost and other surcharges up front. |
| Centralized Communication | All quotes live in one place; no lost emails or scattered spreadsheets. |
| Seamless Data Flow | Once a supplier wins, their quote data (price, lead-time, freight) syncs directly back to your Project Sheet—and feeds smoothly into a Purchase Order. |
🧭 Step 1: Select the Items to Quote
-
Open your Project Sheet.
-
Check the items you want to include.
Pro Tip💡: Use Group By > Category (or another field) to isolate items faster—e.g., locate and select all or some Electrical items in a few clicks.
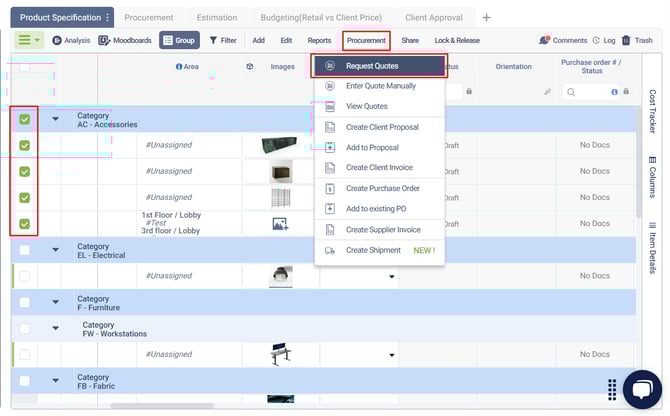
🧭 Step 2: Launch Request Quotes
-
Toolbar > Procurement > Request Quotes.
-
Pick an RFQ template (or create/edit—see Step 2a).
-
Click Continue to open the draft RFQ.

2a — Build or Edit an RFQ Template (first-time only)
-
Click ➕ Template.

- Provide a name & description.
-
Map supplier-input columns: Unit Price, Lead Time, Freight Cost.
-
Add item-info columns the supplier needs (e.g., Product Name, Dimensions).
-
(Optional) Enable Eco Text and map the column.
-
Click Save.
Supplier-vs-Info Columns
• Supplier-input: Vendors fill these.
• Item-info: Read-only context you supply.

🧭 Step 3: Complete the RFQ information
-
RFQ No. – Auto-increments (editable).
-
Creation Date – Auto-filled (editable pre-send).
-
Submission Deadline (Required) – Deadline dictates overdue RFQ status.
-
Ship To / Bill To – Ensures accurate freight/tax.
-
Attachments – Add drawings, specs, or T&Cs.


Note: From your left, you can ask the Supplier to provide Alternatives, in case the requested items aren't available by checking on the box(es).
On this step you can also Delete Quote Request or Close Quote Request.
🧭 Step 4: Choose Supplier Contacts & Send
-
Email To ➜ select one or more supplier contacts (add new if needed).
-
Enter a Subject (required) and optional message.
-
Toggle Company Logo on/off.
-
Click Send.
Why specific contacts? Quotes go to a responsible person, not a generic inbox, ensuring accountability.

🧭 Step 5: Track Supplier Responses
-
Open the RFQ later: Main Menu > Procurement >Quotes.
-
Locate the RFQ in the list and click to open it.
-
Review the status: Each supplier appears in its own tab.
-
Need another vendor? Click ➕ to add a contact and enter prices manually if necessary.

🧭 Step 6: Compare, Select, and Finalize
-
Click Compare Quotes to view Unit Price, Lead Time, Freight Cost side-by-side.
-
Review the table and decide which supplier best meets your cost-and-schedule needs.
You now have two ways to lock in the winning supplier and push data forward:
| Option | What You Do | What Happens |
|---|---|---|
| A — Supplier Tab > Send Updates |
• Open the supplier’s tab. |
Publishes price, freight, lead-time, supplier to the Project Sheet. |
| B — Compare Quotes > Create PO | • In Compare Quotes, tick the suppliers you want to compare, then click View. • Highlight the winning supplier and click Create PO. |
A prompt asks if you want to overwrite Project-Sheet values: - Yes ➜ data is published, then copied into the draft PO. - No ➜ data stays as-is; PO is still created with the selected values. |
- After either path, review the draft Purchase Order and send it to the supplier.
Result: Whether you publish first or create the PO directly, you can keep your Project Sheet in sync and carry the correct pricing, freight, and lead-time into the Purchase Order—no re-typing required.


FAQ ❓
| Question | Answer |
|---|---|
| Can I invite multiple suppliers at once? | Yes—select multiple contacts in Email To. |
| Why doesn’t a supplier appear? | Add at least one contact for that supplier in Contact Book. |
| What if the deadline passes? | Suppliers lose edit rights; resend a new RFQ if needed. |
| Can I change columns later? | Edit the template, then issue a fresh RFQ. |
(Do keep in mind you can arrange your Project Sheet prior to requesting quotes by Category, Area, or using Group By, so you can send out all items from a section at once) 
After clicking on Request Quote, you will see the screen below. From your left, you can ask the Supplier to provide Alternatives, in case the requested items aren't available by checking on the box(es).

Below, you will be prompted to type in an RFQ#, feel free to use this field in case you are keeping track of different quotes. Set your Create Date (usually the day the RFQ is being sent out), and select the Submission Deadline date. Ship to Address (usually linked to the Project's address) must also be entered.
Down below you will have the opportunity to add any Attachments i.e. PDFs, Word Documents, etc. And you also have the ability to add Notes for suppliers.

IMPORTANT: The submission deadline date, will determine when an RFQ becomes Overdue. The system will automatically detect whether a Supplier has provided a quote and mark it as Received, and in case the deadline arrives without a quote, the RFQ will now show an overdue status.
Coming up next, we will send the RFQ to the Supplier, now that is ready.
1. Click on: Next Step (green)
2. Click on Send to Supplier
*On this step you can also Delete Quote Request or Close Quote Request.

In case the Supplier already exists in your database (Contact Book) you can simply select them from the dropdown. Otherwise, if you are sending the RFQ out to a new Supplier, you will be prompted to add them as a new Company.
Existing Supplier

New Supplier

Click Next, and now similar to adding new contacts, you will be prompted to fill in the Office information, and if necessary Contact Person info. You can also quickly get back to the Company details or Account details if needed.

Once the Supplier has been added it will be shown below the dropdown. Feel free to send the RFQ to as many Suppliers as you need.
Next type the Subject title (Suppliers will receive RFQs as emails) along with a Message.
Below you will be given the option to add your Company Logo. Click Send when the RFQ has all the info you want.

We hope this article was helpful, please rate the article, and reach us via Live Help if you still need assistance.